Hey there! If you haven’t already, take a quick look at my previous post, where I lay out a high-level plan for building this blog.
All caught up? Wonderful - let’s dive in!
As I mentioned there, I am not a web developer. It’s never been of much interest to me.
But to host this blog I had to take a crash course.
This post covers my experience building this blog site using Hugo, a static site generator written in Go.
Static Sites and Generators #
When building the website, I wanted as little to do by hand as possible. Ideally, I wanted something that would do all the heavy-lifting for me. I didn’t want the focus of this project to be “how to build a website”.
After some googling, I started reading about static websites - a website typically made up of only the HTML for each page.
Static web pages remain the same every time they’re visited by users. Static sites can still include JavaScript for interactivity, but the base HTML doesn’t change on each user request.
In contrast, dynamic web pages are generated on-the-fly at runtime, and so their contents may change on each visit.
For example, compare this blog site (which is static) to a weather forecasting site, which is likely to change if not with each visit, at least very frequently.
I was keen to go with a “static” approach for the following reasons:
-
Infrequent changes: the blog’s content won’t change often. Sure, I might make edits after publishing, but even so it makes sense to serve everything at once to any users.
-
Efficiency: this blog runs 24/7 on a Raspberry Pi, so I don’t want to run anything that would consume either too much power, or take too long to serve to visitors. Static web pages are stored in their entirety and served as-is, which makes them snappy.
-
Security: static web pages don’t have the same security considerations as dynamic web pages, such as input validation, server-side vulnerabilities, and session management (to name a few).
With that decided, the next step was to actually generate the site.
Static site generators are software tools that take as input a markup language - such as Markdown, JSON, or reStructured text - and generate static web pages from them.
There are quite a few to choose from, such as Jekyll built from Ruby, Next.js built with JavaScript and React, and Pelican for Python and reStructured text.
The one that caught my eye though was Hugo.
Why Hugo? #
I was drawn to Hugo initially because it could translate Emacs Org files into Markdown, which Hugo then uses to build the website. This was attractive to me as I was also getting to grips with Org at the same time.
I also liked the look of Hugo since it’s fast and flexible with good documentation. The Hugo website is comprehensive, and I particularly liked the themes page which showcases themes you can use for your site.
Initial Setup #
Hugo has good documentation for installation. I followed the instructions for installing on Linux.
Oddly, Hugo has three different versions:
-
Standard - Provides core functionality.
-
Extended - Allows encoding to WebP when processing images, and allows transpiling Sass to CSS.
-
Extended/Deploy - Same as above but also includes deploying sites directly to Google Cloud Storage Bucket, AWS S3, or an Azure Storage container.
The different versions caused me an issue in the beginning as I installed the Standard edition which as it turns out didn’t have the features I needed.
This took a bit of debugging as the issue manifested as the theme misbehaving, so I wasn’t sure if the problem was with Hugo or with the theme I had chosen.
I uninstalled that and went with the Extended edition instead, which is the recommended edition. This seemed to fix things.
Installing #
You can install Hugo in a few different ways.
I chose to install through the snap package manager - a simple sudo snap install hugo --channel=extended on the command-line.
Why Snap Packages? #
I had my reasons for choosing to install with snap:
-
Snap packages are simple to install, and update automatically - a true set-it-and-forget-it solution.
-
The Hugo snap package is strictly confined meaning it runs in complete isolation, up to a minimal access level - an important security consideration.
There are some downsides though:
-
The snap version of packages can lag behind the latest release. This isn’t a problem for me as neither I, nor the theme I chose, require the latest version.
-
Automatic updates are a double-edged sword - great for staying up-to-date, but things can break unexpectedly. You can disable automatic updates with
sudo snap refresh --hold hugoif you so desire.
Writing Content #
Hugo accepts a number of markup types, but since working on this blog I have stuck to Markdown.1 I’ve found it easy to work with and well-documented.
Content files start with what Hugo calls front-matter, an area for metadata such as the date, title, and establishing relationships between content.
After that, you write your Markdown content as usual. You can create headings and subheadings, make text bold, italic or strike-through, insert links to content on the internet or internal links to other markdown pages, embed pictures and video, and so on.
Directory Structure #
Hugo has a specific directory structure.
blog/
├── archetypes/
├── assets/
├── content/
├── data/
├── i18n/
├── layouts/
├── static/
├── themes/
└── hugo.toml-
blog: at the top-level you have your site (can be called whatever you like, in this case blog) inside which everything else is stored.
-
archetypes: contains templates for new content.
-
assets: global resources (such as images, CSS, JavaScript, TypeScript etc.) live here.
-
content: the actual content of your site lives here.
-
data: holds data files (such as JSON, TOML, YAML, or XML) that augment content configuration, localisation, and navigation.
-
i18n: contains translation tables for multilingual sites.
-
layouts: templates to transform content, data, and resources into a complete site.
-
public (not shown in the tree above): when Hugo generates a new website, it creates a
publicdirectory, and stores all the generated and linked HTML and JavaScript in it. -
static: contains files that get copied to the
publicdirectory when the site is built. -
themes: pretty explanatory - contains one or more themes, each in its own subdirectory.
-
hugo.toml: site configuration.
Shortcodes #
Hugo has special syntax for inserting certain elements into content files, which it calls shortcodes.
A shortcode is a template invoked within markup which may accept any number of arguments.
Shortcodes have the following syntax (for opening and closing):
{{< foo >}} … {{< /foo >}}
Hugo has 3 kinds of shortcode:
-
embedded: pre-defined templates.
-
custom: user created.
-
inline: defined within content.
You can define custom shortcodes in the layouts/shortcodes directory as HTML snippets.
One of the most useful shortcodes I’ve been using is
{{< table_of_contents >}}
which generates a table of contents for a given page.
Themes and Customisation #
Choosing the right theme is one of the most important steps when building a new site.
As I said at the beginning, Hugo has a really good site for previewing pre-made themes.
For this blog, I chose the Terminal theme, for its simplicity and retro-tech aesthetic - very suitable for a tech-blog.
Installing Themes #
You can get a theme either through Hugo’s module system or through git submodules.
Personally I’ve stuck with git submodules as they allow me to see exactly what changes when the theme is updated, giving me more control.
Hugo modules are the newer, recommended approach though, and I may switch to them at some point in the future.
Editing Themes #
You can make changes to your theme as required.
Referring back to the Hugo directory structure, theme customisation is done in the layouts directory.
You can define specific layouts for certain sections of your website. For example, I have custom layouts for Posts, Articles and Projects.
Customised layouts are written as HTML files, and are placed in a directory named after the section of your site they relate to.
You can also specify what your layout applies to, for example if it applies to a list of posts or a single post.
In my case, I have a custom layout for the ‘Projects’ homepage, as well as a custom layout for the list of posts someone sees when they click on a project. The directory structure looks something like this:
blog/
├── layouts/
    ├─ projects/
    |   └── list.html
    └─ project-posts/
        └── list.html
Hugo has rules for looking up custom layouts, and uses a special _default directory as a fallback if it can’t find a layout you specify.
Workflow #
I wanted my workflow to be as efficient as possible, which meant I wanted to see my changes to the site in real-time.
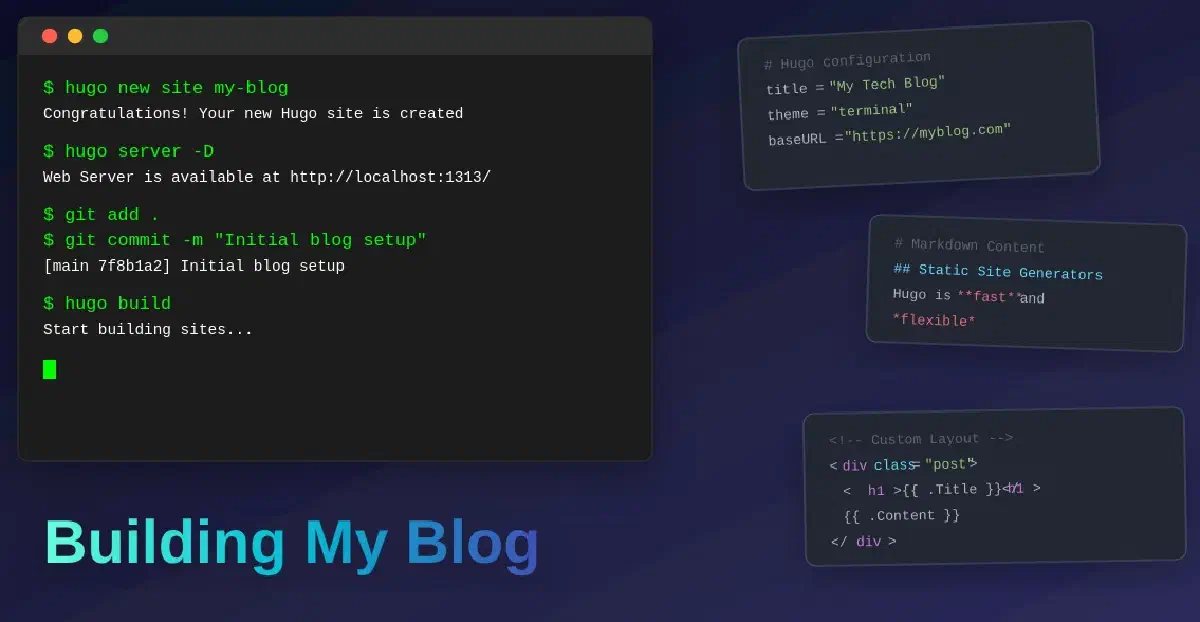
Hugo has a really handy command-line tool for this - hugo server.
Hugo provides its own webserver to build and serve the site. Hugo also watches files for changes and automatically rebuilds the site on save.
I’ve found this incredibly useful.
When working on a new post, I usually start by opening a terminal, navigating to my blog directory, and running hugo server -D --disableFastRender.2 Hugo checks the entire site is valid, builds it, and serves the site on port 1313 on localhost.
Any time I make a change and save it, Hugo automatically rebuilds and serves the site. It gives me a link to the local port the webserver is listening on, which I can click and open in my web browser.
Sometimes though, changes don’t show up immediately after a reload.
This is usually down to a code error or browser caching. I typically clear the browser cache first — if that doesn’t work, it’s debugging time!
Final Thoughts #
There’s much more to Hugo than I’ve mentioned here, and indeed there’s more features to Hugo than I currently make use of. But I think this is a good introduction.
As time goes on and I explore more of Hugo, I’ll keep posting about my discoveries and experience.
With building the site nailed down, the next challenge was figuring out how to host it - something I’ll cover in the next post…