
After spending weeks building this Hugo-based blog and getting it hosted on a Raspberry Pi, I found myself facing a tedious reality: every time I wanted to publish a post, I had to manually build the site, SSH into my Pi, copy files around, and hope I didn’t mess anything up along the way.
There had to be a better way.
This is where automation comes in, specifically continuous integration and continuous deployment (CI/CD). By the end of this post, I’ll show you how I transformed my publishing workflow from a multi-step manual process into something beautifully simple: push to a test branch to preview changes, then merge to main to go live. No SSH required.
Automation Goals #
When I began the automation process, I had a few things in mind:
- As I’ve mentioned in earlier posts, I wanted to have a “test” site to preview my changes and see how the site looked on different devices, such as phones and tablets. The test site will only be available on my local network.
- When I’m happy with the changes, I want to “approve” them, which should cause the creation of the “live” site. The live site will then be published.
- I want the site-building process, removing the old live site from the webserver, and replacing with the new live site, all to be done automatically.
These 3 goals were my starting point.
Setting Up The Repo #
Next I had to configure the git repo for CI/CD. I chose GitLab as the hosting platform since I’m most familiar with its CI/CD model.
After the repo was created on my machine, I created the project in GitLab, then linked the two.
I added a .gitlab-ci.yml file, the top-level file in which the CI/CD code goes - we’ll discuss this later.
I also added a .gitignore file to ignore editor-specific files such as .vscode/, the Hugo output directory public/, and some other things you don’t want under version control.
Finally, as the blog contains images, I wanted to bring them under Git’s control too.
Since images tend to be larger files (anywhere from a few hundred kB to a few hundred Mb, and maybe more), I used Git Large File Storage (LFS), an extension that helps manage large files efficiently by storing them separately on a Git LFS server outside your repo, and replaces references to those files with pointers inside your repo.
There’s good documentation for setting Git LFS up, so I won’t go into detail here, but once everything is set, git lfs will start tracking certain file types - image files in my case. You can confirm this on GitLab by navigating to your image file(s) after pushing:

Branch Structure #
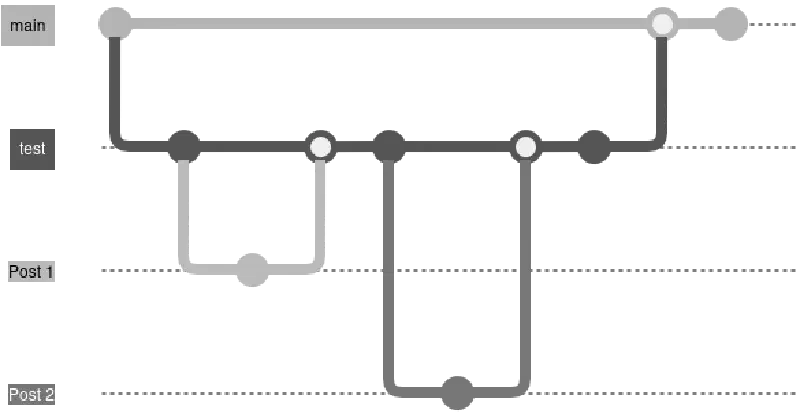
To achieve the test and live site workflow, I decided to have a dedicated git branch called test for the test site, and use the main branch for the live site.
I would branch off from test into feature branches, creating a new branch for each post or change to the site.
Once finished with the change, I’d merge the feature branch into test. Doing so would trigger the CI/CD to build the site and host on my local network. I can then view the changes on any device on the network (including smartphones, tablets, laptops and desktops).
Once I’m happy with everything, I create a merge request from test to main. I force myself to do this as a last review step, and also so I can use some GitLab branching features, such as protecting main so it cannot be merged into directly, and also preventing the test branch from being deleted once merged into main.
Approving the merge request triggers CI/CD to build and host the live site.
I’ve included an image below to illustrate the branch flow:
With the repo set up, it was time to think about CI/CD.
CI/CD #
Continuous Integration and Continuous Delivery/Deployment (abbreviated to CI/CD) is a software engineering practice which automates the process of integrating code changes and delivering software updates.
Continuous Integration involves some best practices:
- Build automation: building software unattended (without human input), usually with the help of a build tool.
- Testing locally: some proponents say you should use test-driven development and ensure all unit tests pass locally before pushing to the integration branch. For me, this meant running the website locally while editing.
- Continuous delivery and continuous deployment: continuous delivery guarantees that software checked in is always “deployable” to users, and continuous deployment automates the deployment.
Funny how an important part of continuous integration is continuous delivery and continuous deployment - it shows how interdependent CI/CD is.
Anyhow, continuous delivery involves producing software in short cycles so it can be released at any time. This is enabled through a deployment pipeline, which itself has 3 components:
- Visibility: every part of the delivery system (building, deploying, and testing) is visible to every member of the team.
- Feedback: team members are made aware of problems as soon as they occur (ideally), so they can be fixed quickly.
- Continually deploy: deploy and release new versions through an automated process.
Now that we’re all up to speed with the theory, I’ll explain how I applied these concepts when building this blog site.
GitLab CI/CD #
At its core CI/CD is all about running pipelines.
A pipeline is an automated process for compiling/building projects, running tests, deploying, and so on.
To build CI/CD pipelines with GitLab, we do so with the .gitlab-ci.yml file I mentioned earlier.
I won’t go into the nitty-gritty as there is very good documentation available, but we’ll explore the core concepts.
Stages #
We split a pipeline into stages - logical groupings of work.
Imagine you had to install project dependencies, compile your code, then run tests. You could define 3 separate stages in your pipeline for each of those tasks: configure, build, and test.
To define this in .gitlab-ci.yml:
stages:
   - configure
   - build
   - test
Stages are run in the order top to bottom (configure -> build -> test).
Jobs #
Once you’ve defined the pipeline stages, we need to define the work that will be done for each stage.
GitLab CI/CD jobs have a certain structure and offer lots of configuration options. Again, we won’t go into the gory details as everything is well documented, but going back to our little example from earlier, let’s say our pipeline required us to:
- install build dependencies
- compile and build the application
- run the test suite
Our job structure would look something like this (I’ve used echos as placeholders)
stages:
   - configure
   - build
   - test

configure-environment:
   stage: configure
   script:
      - echo "Installing dependencies..."
      - sleep 3
      - echo "Dependencies installed!"

build-app:
   stage: build
   script:
      - echo "Building dependencies..."
      - sleep 3
      - echo "Compiling code..."
      - sleep 2
      - echo "Everything is built!"

run-tests:
   stage: test
   script:
      - echo "Running tests..."
      - sleep 5
      - echo "100% of tests passed."
Remember, since stages run from top to bottom, our jobs will also run from top to bottom (configure-environment -> build-app -> run-tests).1
Now that we’ve defined the jobs in our pipeline, we need a way to run them. Enter the runner.
Runners #
Runners are machines which execute pipelines.2
Runners can be configured in a multitude of ways, and can be run on physical machines or from the cloud, using for example Amazon EC2 instances.
Runners can be configured to run specific pipeline jobs through the use of tags.
Suppose we have a dedicated machine we’ve configured to use the tag local-runner. To specify pipeline jobs to run on this runner, we would edit our .gitlab-ci.yml file like so:
stages:
   - configure
   - build
   - test

configure-environment:
   stage: configure
   tags:
      - local-runner
   script:
      - echo "Installing dependencies..."
      - sleep 3
      - echo "Dependencies installed."

build-app:
   stage: build
   tags:
      - local-runner
   script:
      - echo "Building dependencies..."
      - sleep 3
      - echo "Compiling code..."
      - sleep 2
      - echo "Everything's built!"

run-tests:
   stage: test
   tags:
      - local-runner
   script:
      - echo "Running tests..."
      - sleep 5
      - echo "100% of tests passed."
Putting It All Together #
Alright we’ve got the basics down, how did I put all of this together for this blog project?
Configuring The Runner #
Since I’m hosting this blog on my Raspberry Pi, I decided to configure the CI/CD to run on the Pi.
For starters, this meant installing the GitLab Runner:
# update package index and upgrade packages
sudo apt update
sudo apt upgrade -y

# add the GitLab runner repository
curl -L "https://packages.gitlab.com/install/repositories/runner/gitlab-runner/script.deb.sh" | sudo bash

# install the GitLab Runner software
sudo apt install gitlab-runner
Next we need to add the runner on GitLab itself. You can do this for a project by going to CI/CD -> Runners.
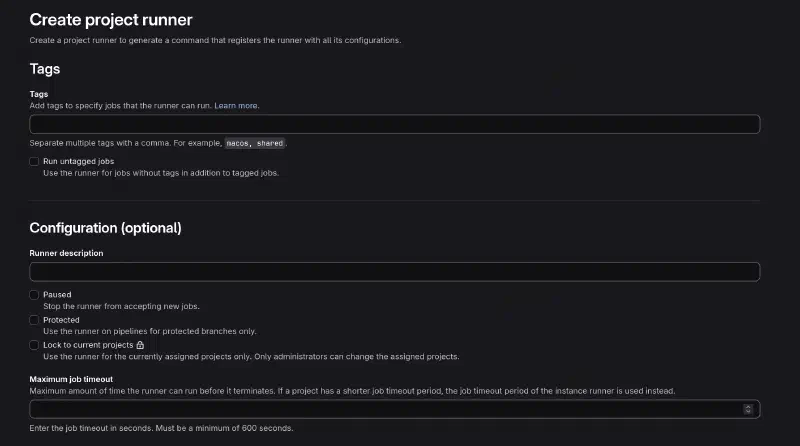
This will give you a registration key which you use on the runner itself:
gitlab-runner register $ACCESS_KEYI also set the Pi runner to use the tag pi to control which jobs it will run, and also to have the possibility to add other runners later on.
The Pipeline #
I began thinking about pipeline stages and how many I’d need. To keep things simple, I kept it to 2:
stages:
   - build
   - deploy
Then I identified the pipeline jobs I’d need:
- Build the site.
- Deploy the site.
Done! 😂
I then began thinking about what the jobs themselves would look like.
To begin with, I needed to handle cloning the website’s theme.
Hugo has documentation for handling site themes, and as I mentioned back in my post about building the site, Hugo supports different ways of installing themes.
I decided to install my theme as a git submodule. This meant that for the build CI/CD job, one of the first things I’d have to do is retrieve the latest version of the theme:
build-site:
  stage: build
  tags:
    - pi
  script: |
    # updates local submodule URLs
    git submodule sync --recursive
    # checkout the submodule content
    git submodule update --init --recursive
Clearing The Environment #
Next I had to think about managing the runner environment, since my runner is self-managed and runs on my own hardware (the Pi).
By default, GitLab runners clean-up build artifacts between pipeline stages.
For example if your pipeline file looks something like this:
stages:
   - build
   - test

generate-executable:
   stage:
      - build
   script:
      - echo "Building app..."
      # write build result to 'foo'
      - echo "App built" > foo

test-executable:
   stage:
      - test
   script:
      - echo "Testing app..."
      # read 'foo'
      - cat foo
The test-executable job will always fail because the runner does not keep artifacts between jobs.
Specifically, the cat foo part will fail, since foo will be cleaned up after the generate-executable job.
You can fix this by using job artifacts, where things are saved and retrieved between jobs.
Another approach is to tweak the git behaviour of the runner, specifically a variable called GIT_CLEAN_FLAGS, which tells git to ignore some files when doing cleanup.
When Hugo builds a static site, it puts everything in a directory called public. This is what we’ll eventually want to point Nginx (our webserver) to, so it can be served to visitors.
The trouble is that by default, the runner will clean up the public directory after the build job, before we get to the deploy job.
To stop this, I added this line to my .gitlab-ci.yml file:
variables:
  GIT_CLEAN_FLAGS: -ffdx -e public/
This tells Git to cleanup untracked files and directories, but to leave anything matching public.
As a side note, Hugo may sometimes cache things between builds, so it’s recommended to delete old public folders before re-building. I’ve also included this:
rm -rf public/Building The Site #
Finally we need to tell Hugo to build the new site:
hugo -D --enableGitInfoThis tells Hugo to build the site (including content files marked as draft), and also to include Git info for said content.
My build job then looked like this:
build-site:
  stage: build
  tags:
    - pi
  script: |
    git submodule sync --recursive
    git submodule update --init --recursive
    # delete old 'public' folder
    rm -rf public
    hugo -D --enableGitInfo
With us now able to generate the public folder automatically as part of CI/CD, it was time to think about deployment.
Deploying The Site #
Since I’m using Nginx as my webserver, I need to somehow point Nginx to the Hugo-built public directory in order to deploy the site.
To serve a site, Nginx expects the site files to be in a certain location, specifically /var/www. Since I want separate live and test sites, I created the following subdirectories: /var/www/live and /var/www/test.
I configured Nginx to serve the live site from /var/www/live and the test site from /var/www/test.
Now pointing Nginx to the built public folder was simple: all I had to do was copy the public folder to the website location.
cp -r public <nginx location>Initially this caused me problems as copying the public directory kept failing. After some digging I found the reason - the GitLab runner didn’t have the correct permissions for copying things to /var/www.
I wrote a custom shell script which would manage the copying of files to /var/www as a first solution to this problem. I gave the runner permissions to run this script, but I wasn’t satisfied as it’s a bit of a security risk and I didn’t really like having a hidden script that wasn’t under version control.
While searching for a more robust solution, I came across Access Control Lists - a list of rules specifying what users can access.
This gave me a way of allowing the GitLab runner access to /var/www/live and /var/www/test only.
For deploying to the live site, my CI/CD job looked like this:
deploy-live:
  stage: deploy
  tags:
    - pi
  script: |
    # requires gitlab-runner to have
    # permission to run this
    set -e
    [ -d /var/www/live/public ] && rm -rf /var/www/live/public
    cp -r public /var/www/live
The runner first checks if the /var/www/live/public directory already exists, and if it does, it deletes it. Then it copies the new Hugo-generated public directory to the /var/www/live path. Nginx then automatically serves the newly-built site.
The CI/CD job for deploying the test site was almost identical, the only difference being /var/www/live became /var/www/test.
Refactoring #
Here is my original .gitlab-ci.yml file:
build-site:
  stage: build
  tags:
    - pi
  script: |
    git submodule sync --recursive
    git submodule update --init --recursive
    # delete old 'public' folder
    rm -rf public
    hugo -D --enableGitInfo

deploy-test-site:
  stage: deploy
  tags:
    - pi
  script: |
    # requires gitlab-runner to have
    # permission to run this
    set -e
    [ -d /var/www/test/public ] && rm -rf /var/www/test/public
    cp -r public /var/www/test

deploy-live-site:
  stage: deploy
  tags:
    - pi
  script: |
    # requires gitlab-runner to have
    # permission to run this
    set -e
    [ -d /var/www/live/public ] && rm -rf /var/www/live/public
    cp -r public /var/www/live
There’s some things to note here:
- The
deployjobs are effectively identical. - This CI/CD file makes no distinction between
liveandtestbranches, meaning regardless of which branch I pushed to, both the test and live site would be re-built and re-deployed.
To deal first with the duplication issue, I created a job template for deploying the site, and then used that template in separate jobs for deploying the test and live site. I also added some variables (SITE and NGINX_DIR) for handling the live and test subdirectories in /var/www/:
# jobs that begin with a period are treated
# as "abstract" by GitLab CI/CD, and can
# be re-used in "concrete" jobs using 'extends'
.deploy-site:
  stage: deploy
  tags:
    - pi
  variables:
    SITE: Nothing
    NGINX_DIR: /var/www
  script: |
    # requires gitlab-runner to have
    # permission to run this
    set -e
    [ -d $NGINX_DIR/$SITE/public ] && rm -rf $NGINX_DIR/$SITE/public
    cp -r public $NGINX_DIR/$SITE

deploy-test-site:
  # re-use the "abstract" .deploy-site job
  extends:
    - .deploy-site
  variables:
    SITE: test

deploy-live-site:
  extends:
    - .deploy-site
  variables:
    SITE: live
Nice! But the CI/CD would still run both of these jobs no matter which branch I was pushing to.
To tackle that I added some CI/CD rules to control when jobs should run.
Rules #
In my case, I wanted to specify that the deploy-test-site job should only run when I’m working on a merge request into the test branch, and the deploy-live-site should only run when I’m merging into the main branch:
.live-rule:
  rules:
    - if: $CI_COMMIT_BRANCH == "main"

.test-rule:
  rules:
    - if: >
        $CI_PIPELINE_SOURCE == "merge_request_event" &&
        $CI_MERGE_REQUEST_TARGET_BRANCH_NAME == "test"
And then using the rules in the jobs:
.live-rule:
  rules:
    - if: $CI_COMMIT_BRANCH == "main"

.test-rule:
  rules:
    - if: >
        $CI_PIPELINE_SOURCE == "merge_request_event" &&
        $CI_MERGE_REQUEST_TARGET_BRANCH_NAME == "test"

.deploy-site:
  stage: deploy
  tags:
    - pi
  variables:
    SITE: Nothing
    NGINX_DIR: /var/www
  script: |
    # requires gitlab-runner to have
    # permission to run this
    set -e
    [ -d $NGINX_DIR/$SITE/public ] && rm -rf $NGINX_DIR/$SITE/public
    cp -r public $NGINX_DIR/$SITE

deploy-test-site:
  extends:
    - .deploy-site
    - .test-rule
  variables:
    SITE: test

deploy-live-site:
  extends:
    - .deploy-site
    - .live-rule
  variables:
    SITE: live
Conclusion #
And there we have it - a fully automated blog deployment pipeline that transforms tedious manual work into a smooth, reliable process.
What started as a simple goal - preview changes on a test site, approve them, and automatically publish to live - turned into a practical lesson in CI/CD principles. By leveraging GitLab’s robust pipeline system, Git LFS for managing images, and a self-hosted runner on the Raspberry Pi, I’ve created a workflow that just works.
The beauty of this setup is its simplicity. Push to test to preview changes across all my devices. Happy with what I see? Merge to main and the live site updates automatically. No manual SSH-ing into servers, no forgetting steps, no wondering if I deployed the latest version.
Along the way, I learned some valuable lessons about runner permissions, Git clean flags, and the importance of proper environment management. The refactoring process also reinforced how small improvements - like abstracting common logic into templates and using rules to control job execution - can make configuration files much more maintainable.
There’s still plenty of room for improvements too. I could add automated testing, link checking, or image optimization. I could expand to multiple runners for redundancy. But for now, this pipeline does exactly what I need it to do, and it does it reliably.
If you’re building your own blog or static site, I hope this series has given you some ideas and shown that setting up CI/CD doesn’t have to be complicated. Start simple, iterate as you go, and automate the boring bits so you can focus on what matters - creating content.
Now if you’ll excuse me, I have some posts to write. And thanks to this pipeline, publishing them will be the easy part.
-
Having multiple jobs in the same stage will make them run concurrently by default. ↩︎
-
Like all concepts we’ll discuss, GitLab has very good documentation for runners. ↩︎